
The Owner Onboarding Process: A 30-Day Playbook
- Rey Rey Rodriguez

- 1 day ago
- 7 min read

A good owner onboarding process converts a signed management agreement into a fully integrated, revenue-producing relationship within roughly 30 days. That is the entire job. The single most important structural decision you make is pairing one named point person with a document portal and a written checklist, because that combination is what stops owners from feeling ignored during the exact window when they’re most anxious about their decision.
Within the first 60 minutes of a signed agreement, the owner should receive a welcome message. Same-day, they get portal access. From there, three deliverables define whether the relationship starts on solid ground:
A welcome packet outlining who to contact and what happens next
A document checklist covering leases, insurance, and access items
A scheduled property inspection to confirm condition and open items
A well-run process from signature to full operational setup typically runs 2 to 4 weeks, covering inspection, system setup, and reporting.
Key Takeaways
An effective owner onboarding process requires a named point person, a document portal, and a first owner statement delivered within 30 days to succeed.
Point | Details |
Assign one point person | Give every new owner a single named contact, never a shared inbox. |
Use a portal, not email | Centralize document collection so owners see progress without asking for updates. |
Follow the phased timeline | Hit welcome within 60 minutes, documents by day 10, and inspection by day 14. |
Send a first statement by day 30 | Even a brief report showing rent and maintenance activity reduces owner anxiety. |
2nd Street’s approach | 2ndstreetpropertymanagement pairs portal-based onboarding with a dedicated contact and 30-day reporting. |
Table of Contents
Why the Owner Onboarding Process Determines Retention
Owners don’t churn because a management fee feels too high. They churn because they signed a contract and then heard nothing for three weeks. Silence during the first 30 days reads as neglect, even when work is happening behind the scenes, and that anxiety compounds fast if the owner is comparing you against a previous manager or a DIY setup they gave up on.

The operational cost of skipping structure is concrete. Missing insurance declarations delay claims. Missing lease copies delay tenant transitions. Missing utility account information stalls maintenance dispatch on day one. Industry guidance backs this up directly: sending a welcome packet within seven days and following a structured 30-day outreach cadence measurably reduces disputes and speeds up compliance.
There’s a second, quieter benefit. Owners who receive clear documentation early are less likely to violate policies or push back on standard procedures later, simply because they understood the rules from day one instead of learning them the hard way through an enforcement conversation.
What Should Happen in the First 30 Days?
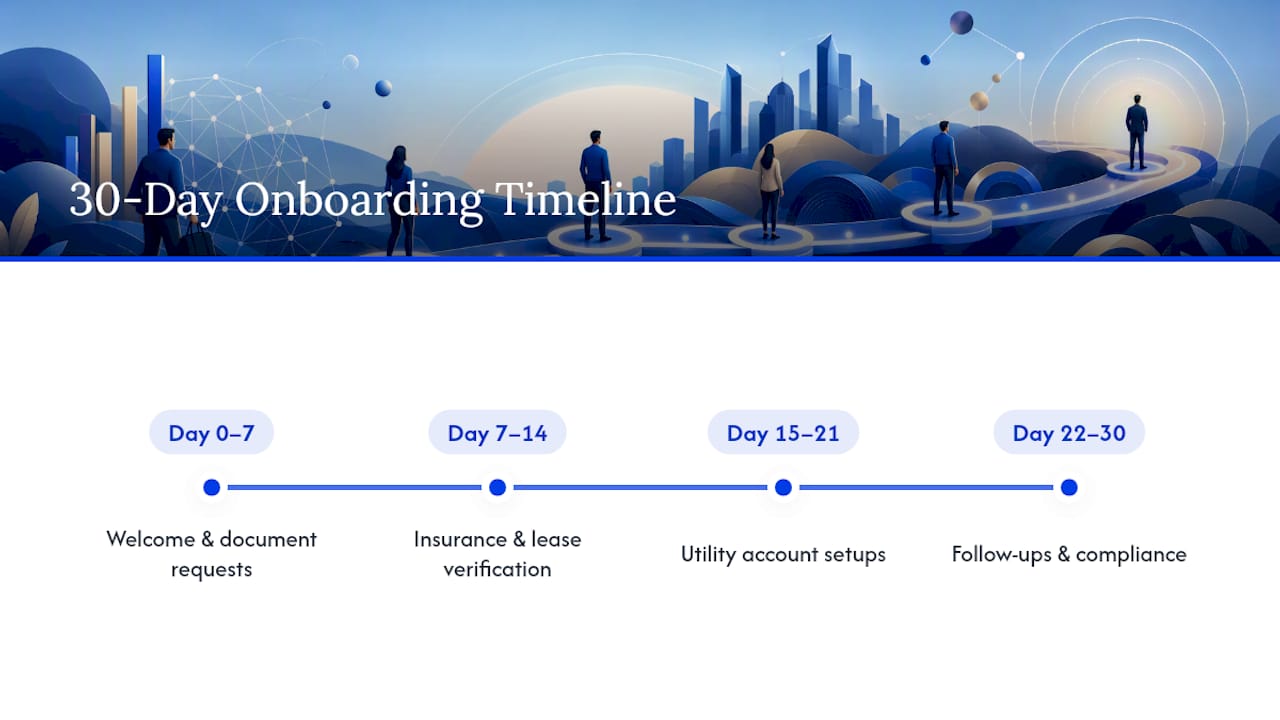
Treat the first month as a managed project with fixed milestones, not an open-ended paperwork exchange. Here’s the sequence that works.
Within the first hour. Send a personal welcome message confirming the agreement is active. Include the portal link, name the assigned point person, and attach the full document request list so the owner knows exactly what’s coming.
Days 2 through 10. Collect signed leases, the insurance declarations page, tenant contact information, and physical or digital keys. Enter the property into your property management system (PMS) with unit details, rent amounts, and lease terms so reporting can start on time.
Days 7 through 14. Introduce the new management contact to tenants, complete a physical inspection with dated photos, and transfer any open maintenance work orders from the previous manager or the owner’s prior self-management setup.
Days 14 through 30. Issue the first owner statement, confirm rent collection is running cleanly through the new system, and schedule a 30-day check-in call to review what’s been done and what’s next.
This sequence mirrors what OnboardMap’s onboarding framework recommends: treat onboarding as a time-boxed project with visible milestones rather than a loose intake process that drags on until someone remembers to follow up.
Pro Tip: Batch your document requests into three or four categories, such as “financial,” “legal,” and “access,” instead of sending them one email at a time. Owners complete a single organized request far more often than they respond to five scattered ones.

If you manage this timeline well, most properties reach full operational integration inside that same 30-day window, with rent flowing and maintenance requests routing normally.
What Documents and Access Do You Need From a New Owner?
Not every document carries equal urgency. Request these in priority order and verify as you go.
Tier one, needed before day one:
Signed management agreement
Insurance declarations page (confirm liability coverage and policy expiration date)
Current lease copies for every occupied unit
Tier two, needed within the first week:
Tenant names, phone numbers, and email addresses
Lockbox codes, remotes, gate codes, and spare keys
Utility account ownership records, so you know who to notify about transfers
Verification matters as much as collection. Check that the insurance policy hasn’t lapsed and that lease terms match what the owner told you verbally. About 30 to 40% of onboarding delays trace back to incomplete or unverified handover documentation, according to handover management research. If a lease clause looks unusual or insurance coverage seems thin, escalate to your point person immediately instead of assuming it will sort itself out later. A tenant screening checklist is worth reviewing at this stage too, especially for properties changing hands from self-management.
How Do You Introduce a New Manager to Existing Tenants?
Tenants didn’t sign up for a new point of contact, so this transition needs to feel routine rather than disruptive.
Send the introduction letter within the first week. State who the new manager is, how to reach them, and where rent payments now go. Deliver it by mail and email, since tenants often miss one or the other.
Activate tenant portal accounts immediately. Set up online payment options before the next rent due date so nobody sends a check to an old address by mistake.
Transfer open maintenance requests with full history. Pull any pending work orders from the previous manager, then document current unit condition with photos during the walkthrough so nothing gets blamed on the transition itself.
Handled this way, tenants barely notice the change beyond a new name on the payment portal, which is exactly the outcome you want.
Systems and Portals: What Actually Prevents Owner Chasing?
Email threads are where onboarding goes to die. A single owner portal with a visible checklist beats scattered emails because owners can see, at a glance, what’s submitted and what’s still outstanding, without asking you for a status update.
Batching matters here too. Group requests into logical sets so an owner can sit down once and finish, rather than trickling in three documents a week for a month. Add automation on top: a welcome trigger within 60 minutes of signing, scheduled reminder emails at set intervals, and a phone escalation rule if a document hasn’t arrived by a fixed date.
Assign one named internal point person per owner, never a shared inbox
Build a progress dashboard that’s visible to both the owner and your team
Automate reminders instead of relying on staff to remember follow-ups
Pro Tip: Portals that display real-time progress toward completion see dramatically higher document completion rates than email-based intake, because owners respond to visible progress bars the same way they respond to a shipping tracker.
How Do You Track and Prove Onboarding Worked?
You can’t manage what you don’t measure, and owners want proof the transition worked, not just a promise that it did.
Track these dates for every new account: agreement signed, portal activated, documents fully received, inspection completed, and first report delivered. The gap between any two of these dates tells you where your process is slowing down.
Milestone | What to Confirm |
Agreement signed | Start date logged, portal invite sent |
Documents received | Insurance, leases, and contacts verified |
Inspection complete | Condition photos filed, open items noted |
First owner statement | Payments, maintenance spend, open items listed |
The first owner statement doesn’t need to be complex. It needs to show real activity, rent collected, maintenance spend, and anything still pending, because even a light first report reduces owner anxiety and signals accountability. Use these same metrics as the agenda for your 30-day check-in call.
Three Things Managers Can Change Today
Most onboarding failures trace back to three fixable gaps: no named point person, no portal, and no first report. Assign a single owner contact, put every checklist item in a portal instead of email, and send a statement by day 30 even if it’s brief. These three changes address the majority of early churn we see across residential and investor-owned portfolios, and they cost nothing to implement beyond discipline. For deeper implementation detail, see our first 30 days guide.
— Main
How 2nd Street Property Management Runs Onboarding for You
2ndstreetpropertymanagement built its onboarding around the exact gaps that cause other managers to lose owners in month one: no portal, no assigned contact, no proof of activity. Every new owner gets a named point person from day one, portal-based document collection instead of email chasing, and a first owner statement inside the 30-day window, so you never wonder whether anything is actually happening behind the scenes.
If you’re evaluating property managers for a residential rental, condo, or Section 8 property in the region, ask any prospective manager to walk you through their onboarding checklist before you sign anything. Then compare it to what 2ndstreetpropertymanagement offers. For portfolio owners juggling multiple properties, a portfolio transparency checklist is also worth reviewing alongside your onboarding documents. Reach out today to request a walkthrough of the onboarding process and see your first 30-day timeline mapped out before you commit.
Sources
Recommended
Comments