
30–60 Min HUD Move In Inspection with Photo/Video for Landlords


Do a signed, photo-backed room-by-room inspection before moving furniture in. That single action creates a defensible baseline you’ll compare against at move-out, and it’s the reason most security deposit disputes get resolved fast rather than dragging into small claims. The rest of this guide walks through the exact checklist, timing rules, and documentation workflow you need, using HUD’s Appendix 5 form and 2ndstreetpropertymanagement’s own field process as the backbone.
TL;DR:
Conduct the move-in inspection on the day of handover before any furniture is moved in, ensuring photos and signatures are obtained immediately.
Use a detailed, room-by-room checklist with attached photos and videos, documenting specific issues with location and size to prevent disputes.
Both landlord and tenant should sign the final report on inspection day or email a timestamped report with photos if signature isn’t possible.
Keep digital records, including photos, videos, and signed reports, stored securely for the full tenancy plus the state’s security deposit return period.
Standardized templates like HUD’s form, combined with professional management processes, improve documentation quality and reduce deposit disputes.
Table of Contents
What Is a Move-In Inspection, and Who Should Be There?
A move-in inspection is a documented walkthrough of a rental unit’s condition before a tenant takes possession. It exists to answer one question later: what did the unit actually look like on day one? Without that record, deposit disputes turn into a memory contest, and memory rarely holds up against a landlord’s estimate for “damages.”
The people in the room matter almost as much as the process itself. The landlord or property manager should walk the unit alongside the tenant, not hand over a blank form and disappear. Some management companies send a dedicated inspector, especially for larger portfolios or Section 8 units where documentation standards run stricter. Whoever conducts it, both parties should sign the completed report before keys officially change hands.
The whole thing typically takes 30 to 60 minutes, depending on the unit’s size and how many items get flagged. A studio with fresh paint moves fast. A three-bedroom house with a deck, a garage, and a finished basement takes longer, especially if you’re testing every outlet and appliance along the way.
What makes this walkthrough a true “baseline” is specificity, not speed:
Every room gets its own line items, not a single blanket note like “unit in good condition.”
Every flagged issue gets a photo tied to it, not a vague written description alone.
Both signatures appear on the final document, dated the same day as the walkthrough.
Skip any of those three, and you’ve built a report that’s easy to argue against later.
Why Thorough Documentation Actually Protects Both Sides
Documentation shifts the burden of proof. Without a signed report, a landlord claiming damage has to prove the unit was pristine at move-in, and a tenant disputing a deduction has to prove it wasn’t their fault. With one, whoever holds the better record wins the argument before it starts.
The distinction that matters most here is normal wear and tear versus chargeable damage, and it trips up more landlords than you’d expect. A carpet that’s faded from two years of sunlight is wear and tear. A carpet with a cigarette burn is damage. Nail holes from hanging a few pictures are wear and tear. A hole punched through drywall is damage. The line isn’t always obvious, which is exactly why a room-by-room checklist with photos matters more than a landlord’s gut instinct at move-out.
Security deposit return windows add urgency to all of this. State rules vary, but deadlines commonly fall somewhere between 14 and 60 days after a tenant vacates. That’s a tight window to compile evidence if you haven’t already documented the starting condition, and it’s why the move-in file needs to exist before the move-out clock ever starts ticking.
A few numbers worth internalizing:
Deposit return deadlines: 14 to 60 days depending on the state.
Inspection length: typically 30 to 60 minutes per unit.
The single biggest predictor of a clean deposit return: a signed, itemized move-in report with photos attached.
Pro Tip: Keep move-in records for the full length of tenancy plus your state’s deposit return window. If a tenant stays three years, that file needs to survive all three, not just the first month.
When to Schedule the Inspection (and What to Do If You Miss the Window)
Timing is not flexible if you want a defensible record. The inspection should happen on key handover day, before a single box or piece of furniture enters the unit. Once a couch is sitting in the living room, you can’t photograph the floor underneath it, and any pre-existing scratch or stain becomes unprovable.
Most leases specify an inspection window, often somewhere in the first 24 to 48 hours of occupancy. Some management companies build the walkthrough directly into the lease signing appointment, which is the cleanest approach because it removes any ambiguity about who’s responsible for scheduling it.
If that window gets missed, whether the tenant moved in over a weekend or the landlord couldn’t attend, don’t skip the inspection entirely. Do this instead:
Complete the walkthrough as soon as possible, even a few days late, and note the actual move-in date versus the inspection date on the form.
Take photos immediately, before any additional wear accumulates.
Email the report and photos to the other party the same day, creating a timestamped record even without an in-person signature.
A late inspection beats no inspection. A missing one leaves both sides guessing months later.
The Room-By-Room Move-In Inspection Checklist
This is the checklist itself: what to inspect, in what order, and exactly how to phrase your notes so they hold up if a dispute ever reaches small claims court. Walk the unit in the same sequence every time. Consistency makes the report easier to read and harder to argue against.
1. Entry and hallways
Start at the front door. Check the lock mechanism, deadbolt, and weatherstripping. Note the number of keys received and confirm they all work before the walkthrough ends.
Door: Condition of frame, hinges, and paint. Note scratches, dents, or gaps.
Flooring: Material type (hardwood, tile, carpet), and any stains, scuffs, or loose sections.
Walls: Scuffs, nail holes, or discoloration, noted by location (“2-inch scuff, left wall near thermostat”).
Lighting: Confirm every fixture works and bulbs are present.
2. Living areas
Living rooms tend to have the most wall space and the most flooring, so they’re where vague notes cause the most trouble later.
Walls and ceilings: Check for cracks, water stains, or peeling paint, especially near windows.
Flooring: Photograph corners and high-traffic areas separately.
Windows: Test that each one opens, closes, and locks. Note broken screens or cracked panes.
Outlets and switches: Test a sample with a phone charger. Flag any that don’t work.
HVAC vents: Confirm airflow and note any visible dust buildup or damage to vent covers.
3. Kitchen
The kitchen has more moving parts than any other room, which means more opportunities for a dispute later if you skip testing something.
Appliances: Turn on the stove burners, run the oven for a few minutes, open and close the refrigerator and freezer, and run the dishwasher through a short cycle if time allows.
Cabinets and drawers: Open every one. Check for loose hinges, water damage underneath the sink, or missing shelves.
Countertops: Note chips, stains, or burn marks, with location and approximate size.
Sink and faucet: Run hot and cold water, check for leaks under the sink, and confirm drainage speed.
Flooring: Photograph in full light, since kitchen flooring often shows the most wear from foot traffic.
4. Bathrooms
Bathrooms generate more move-out disputes than almost any other room, usually over mold, grout, or fixture wear that existed long before the current tenant arrived.
Toilet: Flush and confirm it refills properly with no running water or leaks at the base.
Tub and shower: Run the water, check for proper drainage, and photograph grout and caulk lines for existing mold or cracking.
Sink and vanity: Test the faucet, check under the sink for leaks, and note the condition of mirrors and cabinet hardware.
Ventilation fan: Turn it on and confirm it’s working, since a broken fan often surfaces in mold-related disputes later.
Flooring and grout: Photograph tile grout closely. It’s one of the most disputed items at move-out.
5. Bedrooms and closets
Walls: Same standard as the living room: photograph nail holes, scuffs, and any discoloration.
Closets: Open every door, check shelving and rods for stability, and note any odor (a smoke smell claimed at move-out needs a baseline).
Windows and locks: Confirm every window opens and every lock engages.
Flooring: Carpet condition matters most here since bedroom carpet often shows the clearest before-and-after comparison.
6. Safety and utility systems
Smoke and carbon monoxide detectors: Test every unit by pressing the button. Replace batteries if they don’t respond, and note the test result on the form.
Water heater: Note the age if visible on the label, and check for visible corrosion or leaks around the base.
Electrical panel: Confirm it’s labeled and accessible, without opening or testing breakers yourself.
7. Exterior, parking, and storage
Exterior doors and locks: Test every entry point, including garages and storage sheds.
Parking area: Note the condition of any assigned spot, driveway cracks, or damage to a garage door.
Yard or patio: Photograph existing landscaping condition, fencing, and any exterior damage.
Storage units: If included, confirm they’re empty and note their condition just like any interior room.
Run through appliances, water, and detectors in every unit regardless of size. Skipping the functional tests is the single most common gap in DIY inspections, and it’s exactly the kind of omission that turns “the dishwasher never worked” into a dispute nobody can resolve six months later.
How to Document Findings So the Record Holds Up
A checklist only protects you if the documentation behind it can survive scrutiny. That means photos, video, written notes, and signatures, each done a specific way.
Photos: Take a wide shot of the full room first, then close-ups of anything flagged. Include a scale reference, like a hand or a coin next to a scratch, so size isn’t disputed later. Use consistent filenames (“Kitchen_Counter_Chip_01”) and keep the photos’ original EXIF data intact by uploading straight from your phone to cloud storage rather than screenshotting or editing them first. That metadata carries the timestamp that proves when the photo was taken.
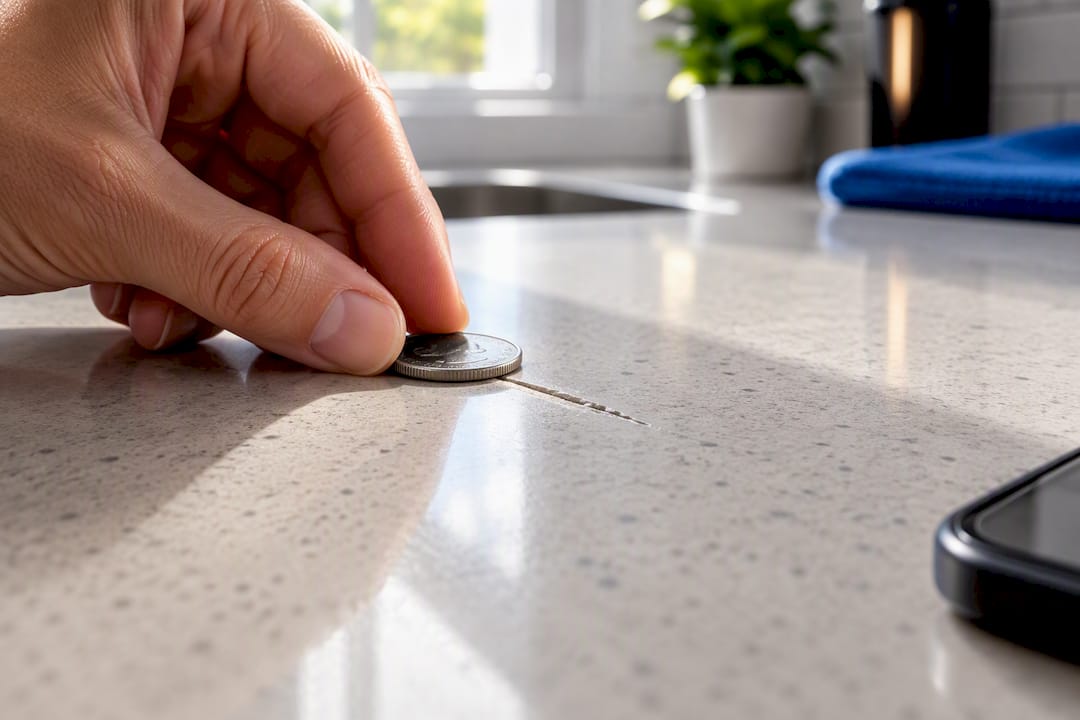
Video: A continuous, narrated walkthrough video backs up your photos and catches details stills might miss. Say the room name and date out loud as you enter each space, and describe what you’re showing as you go (“This is the hallway closet, note the water stain on the top shelf”). Upload and email the video the same day you record it. A video sitting unshared on your phone for two weeks loses some of its evidentiary weight.
Written notes: Vague language is the enemy of a defensible report. “Wall damage” tells an adjudicator nothing. “3-inch scuff mark, 4 feet from floor, left wall of master bedroom” tells them everything. Use consistent condition ratings, like Good, Fair, or Damaged, applied the same way in every room, so a small claims judge or arbitrator can compare entries without guessing what you meant.
Signatures and email backup: Both parties should sign the completed report on inspection day whenever possible. Co-signing removes almost all ambiguity about whether the tenant agreed with the recorded condition. If a landlord or tenant refuses to sign, email the full report with photo and video attachments to the other party and request a read confirmation. That timestamped email becomes your evidence in place of a signature, and it holds up far better than no record at all.
Pro Tip: Never rate every single item “Good” out of habit. A report where everything is marked perfect looks rushed, and it undermines your credibility if you later need to dispute a specific deduction. Rating some items “Fair” with a specific note is more believable and more useful than a blanket “Good” across forty line items.
Where to Find Reliable Move-In Inspection Templates
You don’t need to build a form from scratch. HUD’s Appendix 5 Move-In/Move-Out Inspection Form is a solid starting point because it’s a neutral government document, which carries weight if a dispute ever escalates to a housing authority or small claims proceeding. It covers the basic structure most leases expect: room-by-room lines, a condition rating column, and signature blocks for both parties.
For a more detailed, ready-to-use option, ReportWalk’s move-in/move-out inspection template adds itemized fields that make it easier to attach photos directly to specific line items rather than bundling everything into a general notes section. ResidentInspect’s checklist leans further into functional testing, prompting inspectors to confirm appliances, locks, and detectors work rather than just noting their appearance.
Whichever template you start with, confirm it includes these fields at minimum:
Property address and unit number.
Move-in date and inspection date (if they differ).
Room-by-room line items with a condition rating column.
Space for detailed notes tied to specific flagged items.
A field or note referencing attached photo and video files.
Signature lines for both landlord and tenant, dated.
If you’re moving to a digital workflow, most of these templates convert easily. Fill the form on a tablet or phone, attach photos directly within the document, and use a digital signature tool so both parties can sign remotely if an in-person walkthrough isn’t possible. Store the finished PDF in cloud storage immediately, not just on the device you filled it out on. A phone that gets lost or replaced shouldn’t be the only place your move-in record lives.
If you’re preparing a unit before a new tenant even arrives, it helps to confirm the property meets basic habitability standards and is genuinely rent-ready before the inspection day, since fixing issues after a tenant moves in complicates the baseline record.
How 2ndstreetpropertymanagement Handles Move-In Inspections
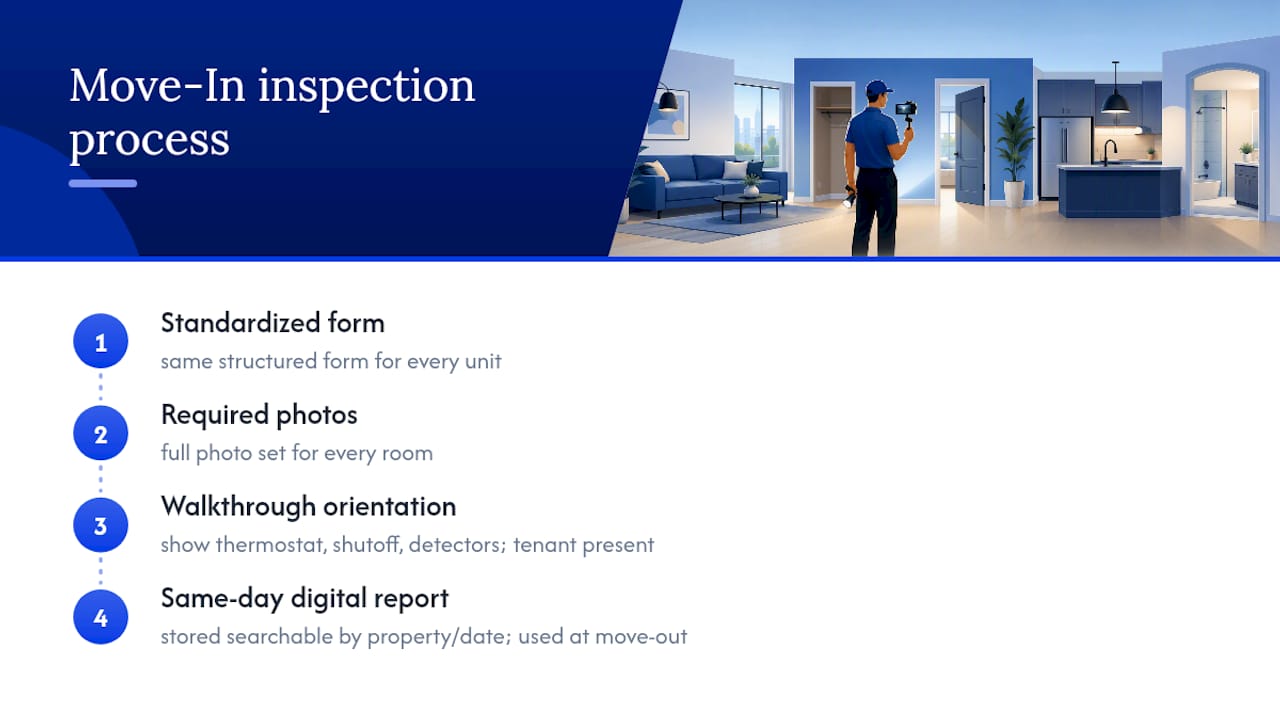
Standardization is the difference between an inspection that protects you and one that just wastes an afternoon. A professional property management company runs every unit through the same structured process: a consistent form, a required photo set for every room, and a walkthrough that doubles as a tenant orientation, not just a paperwork exercise.
That orientation piece matters more than most owners expect. Walking a new tenant through how the thermostat works, where the water shutoff is, and how to test the smoke detectors builds goodwill at the exact moment a landlord-tenant relationship is most fragile. It also means the tenant is present and engaged when items get flagged, which makes co-signing far more likely than if they’re handed a form to review alone later.
A move-in inspection isn’t just a legal safeguard. Done well, it’s the first real interaction that sets the tone for how a landlord and tenant handle disagreements for the rest of the tenancy. The properties with the fewest move-out disputes are almost always the ones where the move-in walkthrough was thorough, collaborative, and documented the same day.
Every completed report gets stored digitally with its full photo set, searchable by property and date, so the file is ready the moment a move-out comparison is needed. That same discipline shows up on the move-out side too, where comparing the two inspections is what actually determines whether a deduction holds up.
What the Conventional Advice Gets Wrong
Most move-in checklists treat documentation as a formality, something you rush through so you can hand over keys and move on. That’s backwards. The inspection is the single highest-leverage 45 minutes in the entire tenancy, and treating it as paperwork rather than evidence-gathering is why so many deposit disputes end up contested.
The bigger blind spot is signatures. Owners obsess over photo quality and checklist completeness, then skip the co-signature because it feels awkward to ask a brand-new tenant to sign something on move-in day. That’s exactly backwards. A signed report with mediocre photos beats a beautifully photographed report nobody signed. If you only fix one habit after reading this, fix that one.
The other overrated idea is that paper forms are inherently more “official” than digital ones. They’re not. A digital report with EXIF-verified photos, a same-day email trail, and a cloud backup is more defensible than a paper form sitting in a filing cabinet, because it can’t be lost, altered without a trace, or forgotten in a drawer. Owners chasing legal formality should chase timestamped evidence instead.
— Main
Let 2ndstreetpropertymanagement Handle the Documentation for You
2ndstreetpropertymanagement is the alternative to piecing together your own inspection workflow from scattered templates and hoping your notes hold up months later. Every unit under management gets a standardized move-in inspection with a full photo and video set, a signed condition report, and a stored file ready for direct comparison at move-out, so deposit reconciliation isn’t a guessing game.
That consistency is the real payoff. Instead of one owner’s rushed phone photos and another unit’s blank notes section, every property gets the same rigor, whether it’s a single-family rental, a Section 8 unit, or a condo under an HOA agreement. Built by investors who manage their own portfolios, the company applies a standardized process for compliance and risk mitigation across every property it manages, including association management for HOA and condo owners.
If you’re tired of chasing down paperwork after a tenant moves out, or you’ve been burned by a deposit dispute that a better inspection would have prevented, visit 2ndstreetpropertymanagement to see how managed inspections and documentation work for your property, and reach out to start a conversation about your specific units.
Primary Templates and Guidance Worth Bookmarking
HUD Appendix 5: Move-In/Move-Out Inspection Form — the government-issued baseline template, useful for its neutral credibility in disputes.
ReportWalk’s move-in/move-out inspection template — a downloadable, itemized checklist built for pairing notes with photo attachments.
ResidentInspect’s move-in checklist — strong on functional testing prompts for appliances, locks, and detectors.
HUD tenant rights and landlord responsibilities — background on deposit return timelines and where state rules diverge.
Rental readiness checklist for homeowners considering a move — broader prep guidance for owners weighing whether to rent or sell.
Sources
FAQ
How long does a move-in inspection take?
Most inspections take 30 to 60 minutes, depending on the unit’s size and how many items need photos or notes. Larger homes with garages, yards, or multiple bathrooms typically run toward the longer end.
What is the purpose of a move-in inspection?
It creates a documented, signed baseline of a unit’s condition before a tenant moves in, so both parties have proof to compare against at move-out. That record shifts the burden of proof and helps resolve deposit disputes based on evidence rather than memory.
Is a move-in checklist required?
State-specific rules vary, and not every state legally mandates a written checklist, but skipping one leaves both landlord and tenant without protection if a dispute arises. Using a template like HUD’s Appendix 5 is considered strong practice even where it isn’t strictly required.
What are the biggest red flags in a move-in inspection?
Malfunctioning smoke or carbon monoxide detectors, plumbing leaks under sinks, and appliances that don’t turn on are the issues most likely to cause disputes or safety problems later. Doors and windows that don’t lock properly are also worth flagging immediately rather than assuming they’ll get fixed later.
How long should I keep my move-in inspection records?
Keep them for the entire length of the tenancy plus your state’s security deposit return window, which typically runs between 14 and 60 days after move-out. Store digital copies in cloud backup rather than relying on a single device or paper file.
Recommended

Comments